
Creating Trustless Transactions: Building an Escrow Program with Anchor
Understanding the Core Concepts Behind Escrow Systems and Implementing Them with Anchor Solana

Introduction to Escrows
In the world of finance and contracts, trust is a cornerstone of any successful transaction. However, when two parties engage in an exchange without knowing or trusting each other, the risk of one party failing to fulfill their obligations looms large.
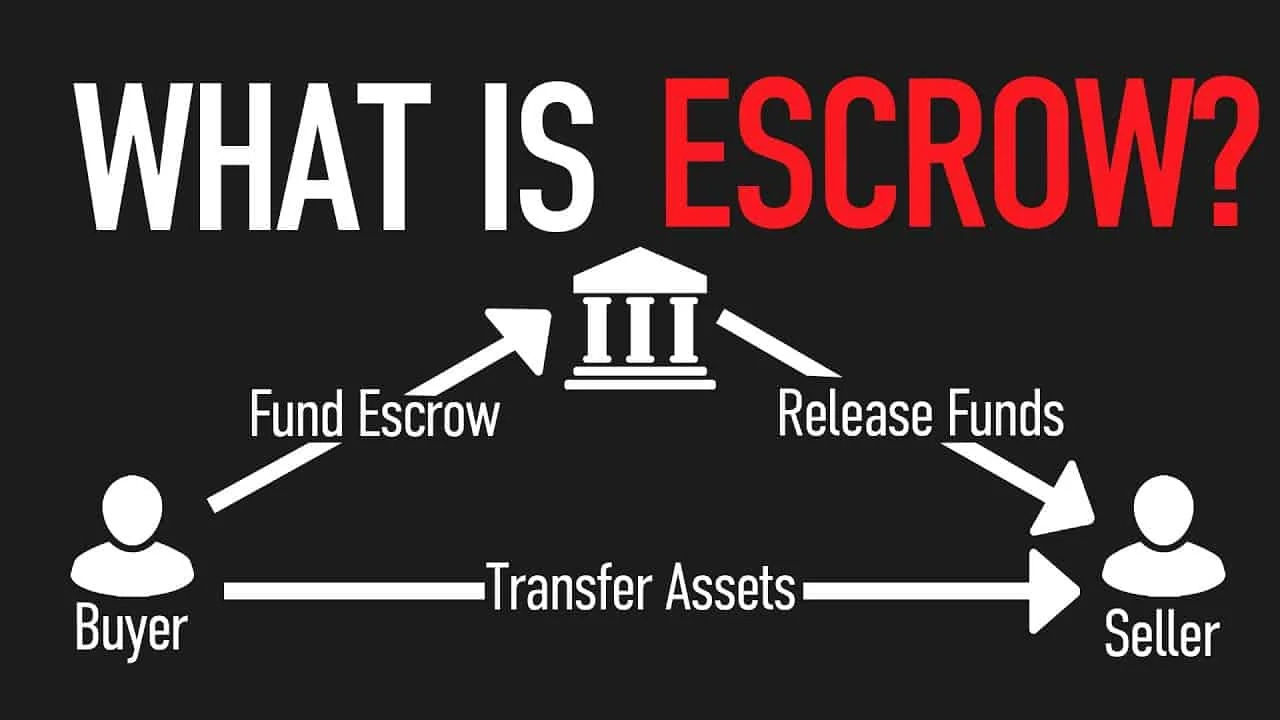
This is where escrows come into play. Escrows serve as neutral third parties that hold assets or funds until all the conditions of the agreement are satisfied. By ensuring that both sides meet their commitments before releasing the assets, escrows play a critical role in maintaining fairness and security in transactions.
Necessity of Escrows in Transactions
In any financial exchange, the risk of either party reneging on the deal can be mitigated by an escrow. Whether it’s buying a house, transferring ownership of a valuable asset, or executing a service contract, escrows act as a safeguard, ensuring that both parties fulfill their obligations before the transaction is completed. This is particularly crucial in situations where the parties involved do not have an established relationship or trust.
In the blockchain context, the concept of escrows is not just necessary but indispensable. Blockchain’s decentralized nature eliminates the need for a central authority, but it also requires a mechanism to ensure that transactions occur fairly and securely. This is where smart contracts—self-executing contracts with the terms directly written into code—come in. These contracts function as decentralized escrows, automating and enforcing the conditions of the agreement without the need for traditional intermediaries.
Inside blockchain ecosystem, escrows are everywhere, powering a wide array of transactions. Whether you’re participating in a token swap, engaging in a decentralized finance (DeFi) service, or contributing to a fundraising campaign, chances are an escrow smart contract is involved. These smart contracts automate the process of holding and releasing assets, making complex transactions seamless and secure.
The Beauty of Blockchain: Trustless Transactions
One of the most transformative aspects of blockchain technology is its ability to facilitate trustless transactions. Unlike traditional systems, where trust between parties is a prerequisite, blockchain allows two parties to engage in a transaction without needing to trust each other directly. Instead, they trust the code—specifically, the escrow smart contract.

These contracts are immutable, meaning once deployed, they cannot be altered. They are also transparent, with the code and conditions open for all to see. This combination of immutability and transparency ensures that the terms of the agreement are enforced exactly as written, without the possibility of fraud or manipulation. The funds or assets are only released when all conditions are met, reducing the need for intermediaries and lowering transaction costs.
This trustless mechanism is not just a theoretical advantage; it has real-world applications that enhance security and efficiency across various industries. For example, in decentralized finance (DeFi), trustless escrows enable complex financial instruments and services that are more transparent and accessible than their traditional counterparts.
Practical Example: Token Swap and Fund Transfer Smart Contracts
To better understand the power of blockchain-based escrows, let’s explore a couple of practical examples.
Token Swap
Imagine two parties, Alice and Bob, want to exchange tokens. Alice holds Token A, and Bob holds Token B. Neither party fully trusts the other to deliver on their end of the deal. In a traditional system, they would need a trusted intermediary to facilitate the swap. However, on the blockchain, they can use an escrow smart contract.
Both Alice and Bob deposit their respective tokens into the escrow contract. The contract is programmed to verify that the deposits are made and then automatically swap the tokens, releasing Token A to Bob and Token B to Alice. The transaction is completed without either party having to trust the other, relying instead on the secure execution of the smart contract.
Fund Transfer Smart Contract
Consider a scenario where a group of people is collectively raising funds for a project. Each participant deposits funds into a shared escrow contract. The contract is designed to hold these funds until a specified amount is reached. Once the total contributions meet the target, the escrow contract automatically transfers the funds to the project’s account.
This setup ensures that the collective contribution is only used when the desired goal is achieved, providing security and transparency to all contributors. If the target amount is not met within a predefined period, the contract can return the funds to the contributors, further ensuring fairness.
Initializing Your Anchor Escrow Project
To get started, open your terminal and navigate to the directory where you want to create your project. Then, run the following command to initialize a new Anchor project named anchor_escrow:
anchor init anchor_escrowThis command sets up the basic structure for your Anchor Escrow program, creating all the necessary directories and configuration files to begin development.
Setting Up the Core Structure: Instructions and State Modules
With the basic project structure initialized, it's time to organize our Anchor Escrow program by adding essential modules for instructions and state management.
1. Creating the instructions and state Folders
In your project directory, create two new folders:
instructions: This will hold the logic for the various actions (instructions).state: This folder will manage the program's state, including the escrow account details.
2. Setting Up the instructions Module
Inside the instructions folder, create a new file named mod.rs. This file will serve as the entry point for all your instruction-related code.
// anchor_escrow/src/instructions/mod.rs
// Export the contents of this module
You can start by adding your instruction functions here as you develop the program further.
3. Setting Up the state Module
Next, create two files in the state folder:
escrow.rs: This file will define the structure of your escrow account.mod.rs: This file will serve as the entry point for thestatemodule.
In mod.rs, declare and expose the escrow.rs module:
pub mod escrow;

pub use escrow::*;
4. Updating lib.rs
Finally, to make sure your new modules are recognized, update your lib.rs file to include and expose these modules:
pub mod state;
pub mod instructions;

pub use state::*;
pub use instructions::*;
Implementing the Escrow Logic: Structs, Instructions, and Initialization
With the foundational structure of your Anchor Escrow project in place, it's time to dive deeper into the code by implementing the escrow logic.
1. Defining the Escrow State
The escrow state is where we'll store the essential information about each escrow account. This includes the details of the tokens involved in the trade, the maker, and the conditions for releasing the tokens.
In escrow.rs:
use anchor_lang::prelude::*;

#[account]
#[derive(InitSpace)]
pub struct Escrow {
    pub seed: u64,
    pub maker: Pubkey,
    pub mint_a: Pubkey,
    pub mint_b: Pubkey,
    pub receive: u64,
    pub bump: u8,
}
Key Points:
Seed: Allows the maker to create multiple escrows.
Maker: The account initiating the escrow.
Mint A & Mint B: The tokens being exchanged.
Receive: The amount the maker expects to receive in return.
Bump: Stores the bump for the Program Derived Address (PDA).
2. Creating the Make Instruction
The Make struct within the make.rs file defines the parameters and accounts needed to initialize an escrow:
use anchor_lang::prelude::*;
use anchor_spl::{
    associated_token::AssociatedToken,
    token_interface::{Mint, TokenAccount, TokenInterface, TransferChecked, transfer_checked}
};

use crate::Escrow;

#[derive(Accounts)]
#[instruction(seed: u64)]
pub struct Make<'info> {
    #[account(mut)]
    pub maker: Signer<'info>,
    pub mint_a: InterfaceAccount<'info, Mint>,
    pub mint_b: InterfaceAccount<'info, Mint>,
    #[account(
        mut,
        associated_token::mint = mint_a,
        associated_token::authority = maker,
    )]
    pub maker_ata_a: InterfaceAccount<'info, TokenAccount>,
    #[account(
        init,
        payer = maker,
        space = 8 + Escrow::INIT_SPACE,
        seeds = [b"escrow", maker.key().as_ref(), seed.to_le_bytes().as_ref()],
        bump,
    )]
    pub escrow: Account<'info, Escrow>,
    #[account(
        init,
        payer = maker,
        associated_token::mint = mint_a,
        associated_token::authority = escrow,
    )]
    pub vault: InterfaceAccount<'info, TokenAccount>,
    pub associated_token_program: Program<'info, AssociatedToken>,
    pub system_program: Program<'info, System>,
    pub token_program: Interface<'info, TokenInterface>,
}
Key Points:
Seed as an Instruction: The seed is passed as an instruction and accessed through the function parameter, allowing flexibility in creating multiple escrows.
InterfaceAccount: Used to support both SPL Token Program and SPL Token 22 Program.
Escrow and Vault Creation: The escrow account is initialized to store the state, and an ATA (associated token account) is created to hold the tokens in escrow.
Token Program: Utilized to transfer tokens using CPI (Cross-Program Invocation).
3. Implementing Core Functions: init_escrow and deposit
Two core functions within the Make context handle the initialization and deposit processes:
impl<'info> Make<'info> {
    pub fn init_escrow(&mut self, seed: u64, receive: u64, bumps: &MakeBumps) -> Result<()> {
        self.escrow.set_inner(Escrow {
            seed,
            maker: self.maker.key(),
            mint_a: self.mint_a.key(),
            mint_b: self.mint_b.key(),
            receive,
            bump: bumps.escrow,
        });

        Ok(())
    }

    pub fn deposit(&mut self, deposit: u64) -> Result<()> {
        let cpi_program = self.token_program.to_account_info();

        let cpi_accounts = TransferChecked {
            from: self.maker_ata_a.to_account_info(),
            to: self.vault.to_account_info(),
            authority: self.maker.to_account_info(),
            mint: self.mint_a.to_account_info(),
        };

        let cpi_ctx = CpiContext::new(cpi_program, cpi_accounts);

        transfer_checked(cpi_ctx, deposit, self.mint_a.decimals)?;

        Ok(())
    }
}
init_escrow: Initializes the escrow account with the provided seed, receive amount, and other necessary parameters.
deposit: Handles the deposit of tokens from the maker's associated token account to the vault, using a CPI to transfer the tokens securely.
4. Integrating Functions in initialize
Finally, these functions are integrated into the initialize function in lib.rs:
pub fn initialize(ctx: Context<Make>, seed: u64, receive: u64, deposit: u64) -> Result<()> {
    ctx.accounts.init_escrow(seed, receive, &ctx.bumps)?;
    ctx.accounts.deposit(deposit)?;

    Ok(())
}
This function orchestrates the entire process of creating an escrow and depositing the initial tokens, setting the stage for the next steps.
Implementing a "Take" Context in Solana Programs: Step-by-Step Guide
In this section, we will walk through the implementation of a "Take" context in a Solana program, where we manage escrow interactions, including depositing tokens, withdrawing them, and closing vaults.
1. Introduction to the Take Context
The Take context handles token transfers between accounts involved in an escrow. We’ll be focusing on creating two main functionalities:
Depositing tokens: Transferring tokens from the taker to the maker’s associated token account (ATA).
Withdrawing tokens and closing the vault: Moving tokens from the escrow's vault to the taker’s ATA and closing the vault account.
2. Context Setup
Let's define the context in the take.rs file:
use anchor_lang::prelude::*;
use anchor_spl::{
    associated_token::AssociatedToken,
    token_interface::{Mint, TokenAccount, TokenInterface, TransferChecked, transfer_checked, CloseAccount, close_account}
};
use crate::state::Escrow;

#[derive(Accounts)]
pub struct Take<'info> {
    #[account(mut)]
    pub taker: Signer<'info>,
    pub maker: SystemAccount<'info>,
    pub mint_a: InterfaceAccount<'info, Mint>,
    pub mint_b: InterfaceAccount<'info, Mint>,
    #[account(
        init_if_needed,
        payer = taker,
        associated_token::mint = mint_a,
        associated_token::authority = taker,
    )]
    pub taker_ata_a: InterfaceAccount<'info, TokenAccount>,
    #[account(
        mut,
        associated_token::mint = mint_b,
        associated_token::authority = taker,
    )]
    pub taker_ata_b: InterfaceAccount<'info, TokenAccount>,
    #[account(
        init_if_needed,
        payer = taker,
        associated_token::mint = mint_b,
        associated_token::authority = maker,
    )]
    pub maker_ata_b: InterfaceAccount<'info, TokenAccount>,
    #[account(
        mut,
        close = maker,
        has_one = maker,
        has_one = mint_a,
        has_one = mint_b,
        seeds = [b"escrow", maker.key().as_ref(), escrow.seed.to_le_bytes().as_ref()],
        bump = escrow.bump
    )]
    pub escrow: Account<'info, Escrow>,
    #[account(
        mut,
        associated_token::mint = mint_a,
        associated_token::authority = escrow,
    )]
    pub vault: InterfaceAccount<'info, TokenAccount>,
    pub associated_token_program: Program<'info, AssociatedToken>,
    pub system_program: Program<'info, System>,
    pub token_program: Interface<'info, TokenInterface>,
}
Key Points:
Initialization of Associated Token Accounts (ATAs): In the
Takecontext, we initialize the taker and maker's ATAs if they don't already exist, allowing for smooth token transfers.Escrow Closure and Vault Management: The context handles the secure closure of the escrow account and the transfer of tokens from the escrow vault to the taker's ATA, followed by closing the vault account.
InterfaceAccount Usage:
InterfaceAccountis used to support both the SPL Token Program and the SPL Token 22 Program, providing flexibility in token handling.Secure Token Transfers: The
Takecontext implements secure token transfers usingTransferCheckedCPI (Cross-Program Invocation), ensuring accurate transfers with checks on the number of decimals.Signer Seeds for Escrow Operations: Signer seeds are used to securely authorize operations involving the escrow account, ensuring that only the correct escrow authority can execute transfers and account closures.
Token Program CPI: The Solana Token Program is utilized to perform token transfers and close accounts via CPI, ensuring that the actions are executed securely within the constraints of the program.
3. Implementing the Deposit Functionality
The deposit function is responsible for transferring tokens from the taker’s mint_b ATA to the maker’s mint_b ATA.
impl<'info> Take<'info> {
    pub fn deposit(&mut self) -> Result<()> {
        let cpi_program = self.token_program.to_account_info();

        let cpi_accounts = TransferChecked {
            from: self.taker_ata_b.to_account_info(),
            to: self.maker_ata_b.to_account_info(),
            authority: self.taker.to_account_info(),
            mint: self.mint_b.to_account_info(),
        };

        let cpi_ctx = CpiContext::new(cpi_program, cpi_accounts);

        transfer_checked(cpi_ctx, self.escrow.receive, self.mint_b.decimals)?;

        Ok(())
    }
}
4. Implementing Withdrawal and Vault Closure
This function transfers tokens from the escrow vault to the taker’s ATA and then closes the vault.
impl<'info> Take<'info> {
    pub fn withdraw_and_close_vault(&mut self) -> Result<()> {
        let seeds = &[
            b"escrow", // byte representation of escrow
            self.maker.to_account_info().key.as_ref(),
            &self.escrow.seed.to_le_bytes()[..],
            &[self.escrow.bump],
        ];

        let cpi_program = self.token_program.to_account_info();

        let cpi_accounts = TransferChecked {
            from: self.vault.to_account_info(),
            to: self.taker_ata_a.to_account_info(),
            authority: self.escrow.to_account_info(),
            mint: self.mint_a.to_account_info(),
        };

        let signer_seeds = &[&seeds[..]];

        let cpi_ctx = CpiContext::new_with_signer(cpi_program, cpi_accounts, signer_seeds);

        transfer_checked(cpi_ctx, self.vault.amount, self.mint_a.decimals)?;

        // Now we will be closing the vault, we will be doing a CPI to the token program for closing this vault
        let accounts = CloseAccount {
            account: self.vault.to_account_info(),
            destination: self.taker.to_account_info(),  // where the lamports will go after deletion of TokenAccount
            authority: self.escrow.to_account_info(),
        };

        let cpi_program = self.token_program.to_account_info();

        let cpi_ctx = CpiContext::new_with_signer(cpi_program, accounts, signer_seeds);

        close_account(cpi_ctx)?;

        Ok(())
    }
}
5. Implementing the complete_escrow Function in lib.rs
This function will be exposed to the user and we will be implementing it in our lib.rs, combining the two previously defined functions.
pub fn complete_escrow(ctx: Context<Take>) -> Result<()> {
    ctx.accounts.deposit()?;
    ctx.accounts.withdraw_and_close_vault()?;

    Ok(())
}
Summary
The anchor_escrow program now provides a comprehensive set of functionalities for securely managing escrow transactions on the Solana blockchain. It handles the creation, deposit, transfer, and closure of escrow accounts, ensuring secure and reliable exchanges between parties.
Bingo! You've successfully completed the program. Your escrow system is now ready to operate on the Solana blockchain! 🎉